Common Electric Oven Faults: A Repair Guide for Homeowners
 Jun, 18 2026
Electric Oven Fault Diagnostic Tool
Answer the following questions to identify the likely cause of your oven malfunction.
Your dinner is ruined because the temperature inside your electric oven is a kitchen appliance that uses electricity to generate heat for baking and roasting food never reached the setting you dialed in. You check the breaker, but it’s fine. The display lights up, but the air inside stays cold. This frustration is shared by millions of homeowners who rely on their ovens daily without understanding how they actually work.
When an electric oven fails, it rarely gives a clear error code. Instead, it presents symptoms like uneven cooking, strange noises, or complete power loss. Identifying the root cause requires looking beyond the obvious "it's broken" assumption. Most common faults stem from three main areas: heating elements, temperature control systems, and mechanical seals. Understanding these components helps you decide whether to call a technician or attempt a simple fix yourself.
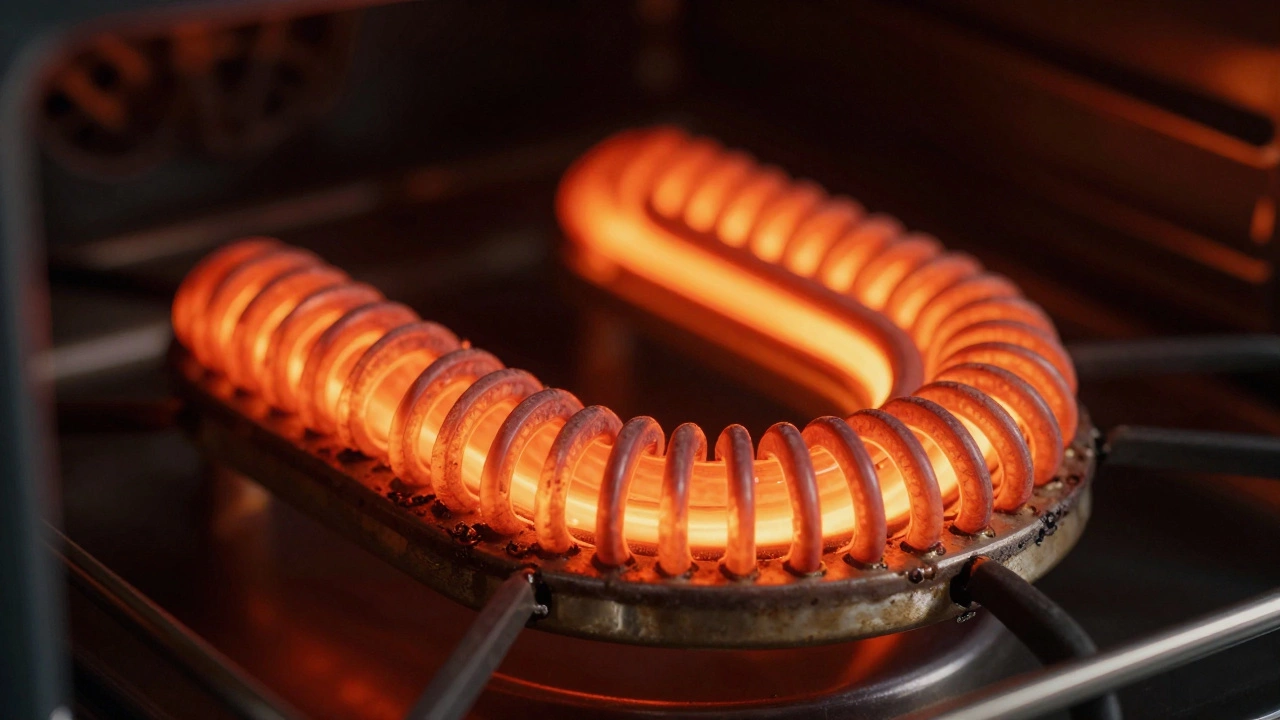
The Heating Element Failure
The most frequent culprit behind an oven that won't heat is the bake element is the primary heating coil located at the bottom of the oven cavity responsible for generating radiant heat. In a standard electric range, this U-shaped metal tube glows bright orange when active. If it looks blistered, cracked, or has dark spots that don’t glow evenly, it has likely failed internally. Even if the element looks intact, a break in the internal wire can stop current flow completely.
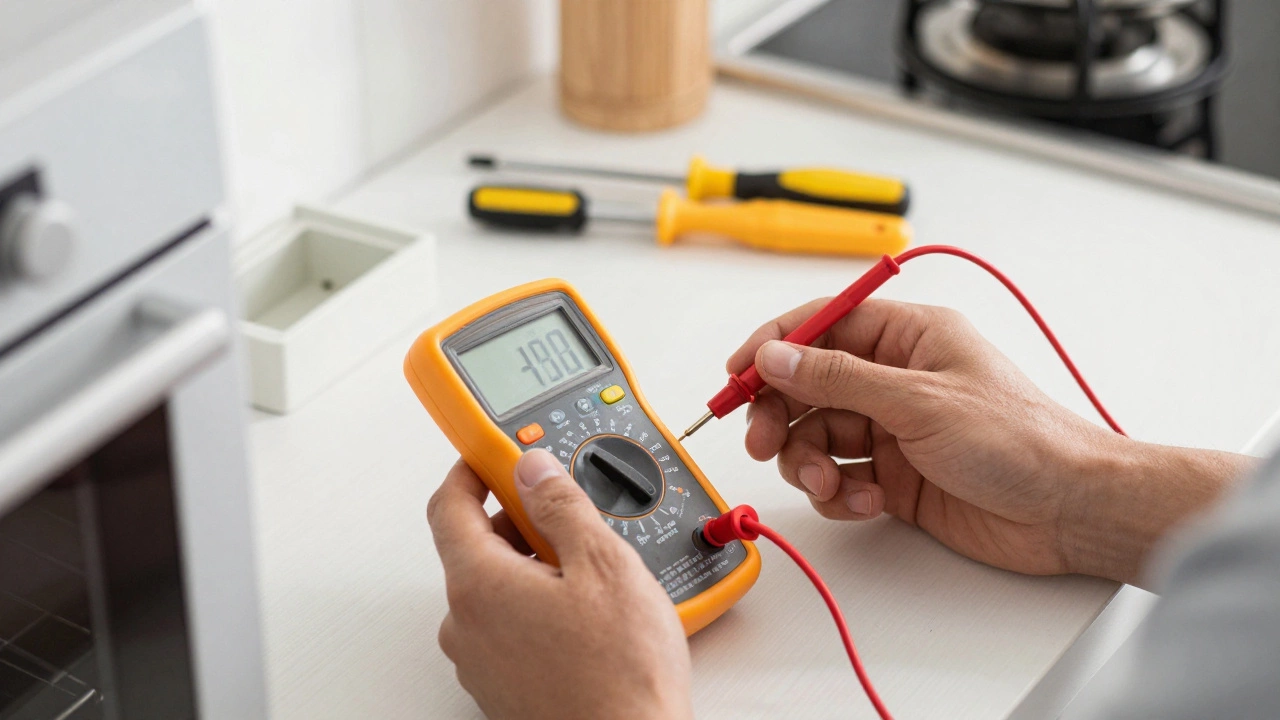
You can test the bake element using a multimeter set to measure resistance (ohms). Disconnect power to the oven first-this is critical for safety. Remove the two screws holding the element in place and pull it forward slightly to access the terminals. Touch one probe to each terminal. A healthy element typically reads between 10 and 30 ohms. If the reading shows infinite resistance (OL on digital meters), the circuit is open, and the element needs replacement. The same test applies to the broil element at the top, though failure there only affects high-heat broiling functions.
Replacing a heating element is often a DIY-friendly task. Elements are universal within brand families, so checking your model number ensures compatibility. However, if multiple elements fail simultaneously, suspect an issue with the power supply or control board rather than coincidental wear. Always allow the oven to cool completely before handling any internal parts to avoid burns.
Thermostat and Temperature Sensor Issues
If your oven heats but runs too hot or too cold, the problem usually lies with the temperature sensor is a thermistor probe that monitors internal oven temperature and sends data to the control board. Located near the rear wall of the oven cavity, this small metal rod changes its electrical resistance based on heat levels. When the sensor drifts out of calibration, the computer controlling the oven receives incorrect data and adjusts the heating cycles accordingly.
To verify sensor accuracy, place an independent oven thermometer inside during preheat. Set the oven to 350°F (175°C) and let it stabilize for ten minutes. Compare the displayed temperature with your thermometer reading. A variance of more than 25°F suggests the sensor or the oven control board is the electronic brain of the oven that processes input signals and manages power distribution to components is malfunctioning. Modern ovens use solid-state relays on the control board to switch power to the elements. If these relays stick closed, the oven may overheat; if they fail open, no heat occurs despite correct sensor readings.
Calibration adjustments are possible on many models through hidden menu settings accessed via button combinations. Consult your user manual for specific instructions. If calibration doesn’t resolve the discrepancy, replacing the temperature sensor is inexpensive and straightforward. Simply unscrew the old probe and install the new one, ensuring the connector clicks securely into place. Persistent inaccuracies after sensor replacement point toward a failing control board, which requires professional diagnosis due to complex circuitry involved.
Door Seal and Gasket Problems
A compromised oven door gasket is a heat-resistant rubber or silicone seal surrounding the oven door that prevents hot air from escaping causes inefficient heating and higher energy bills. Over time, the flexible material degrades from repeated exposure to extreme temperatures, becoming brittle or tearing. Food spills baked onto the seal also compromise its ability to create an airtight closure. You might notice warm air escaping around the edges when the oven is running, or observe condensation forming on the outer glass panel during operation.
Inspect the gasket visually while the oven is cool. Look for gaps where light passes through when the door is closed tightly. Press gently along the entire perimeter; if sections feel loose or detached from the frame, the adhesive bond has weakened. Cleaning the gasket with mild soap and water removes grease buildup that accelerates deterioration. For minor tears, specialized high-temperature silicone sealant can provide temporary relief, but full replacement offers long-term reliability.
Replacing the door seal involves removing the inner door panel to access mounting clips or screws. Some designs slide the new gasket into channels, while others require peeling off old adhesive residue before applying fresh backing tape. Ensure the oven is unplugged during this process. A properly seated gasket restores thermal efficiency, reducing preheat times and improving cooking consistency across all racks.
Control Board and Electronic Glitches
Modern electric ovens depend heavily on microprocessors housed within the main control board is the central processing unit managing user inputs, timing functions, and component activation sequences. Power surges, moisture intrusion, or manufacturing defects can corrupt firmware or damage capacitors. Symptoms include unresponsive touchpads, erratic display behavior, or random shutdowns mid-cycle. Sometimes, simply resetting the appliance clears temporary software glitches.
Perform a hard reset by turning off the circuit breaker dedicated to the oven for thirty seconds, then restoring power. This drains residual charge from capacitors and forces the system to reboot. If issues persist, examine the wiring harness connecting the control board to other modules. Loose connections cause intermittent failures mimicking board damage. Tighten any visible terminals carefully without stripping insulation.
Diagnosing actual control board failure requires measuring voltage outputs at various relay points under load conditions-a job best left to certified technicians. Boards contain proprietary chips calibrated specifically for your model series. Universal replacements rarely exist, making exact part numbers essential. Before ordering a costly board, rule out simpler causes like faulty door switches or jammed relays elsewhere in the system.
Door Switch and Latch Mechanism Failures
The door switch is a safety mechanism that detects whether the oven door is fully closed and allows heating elements to activate only when secure plays a crucial role in preventing accidental burns and ensuring proper operation. If the switch sticks in the 'open' position, the oven interprets the door as ajar and disables heating regardless of other component health. Listen for a distinct click when closing the door; absence of sound indicates potential latch misalignment or switch failure.
Lubricate moving parts of the hinge assembly with food-grade silicone spray to reduce friction causing incomplete latching. Check for obstructions such as warped racks pressing against the door frame. Manually actuate the switch plunger with a non-conductive tool while monitoring continuity with a multimeter. Lack of closure confirmation means the switch needs replacement. These switches are inexpensive and easily accessible once the front trim panel is removed.
Ensure the latch engages smoothly every time. Repeated forcing of the door can bend the striker plate, leading to chronic sealing problems. Align the door correctly according to manufacturer specifications during reassembly. Properly functioning door mechanisms protect both users and appliances from unnecessary stress.
| Fault Type | Symptoms | Difficulty Level | Estimated Cost |
|---|---|---|---|
| Bake Element Burnout | No heat, visual cracks/blistering | Easy | $20-$60 |
| Temperature Sensor Drift | Inaccurate cooking temps, +/-25°F variance | Moderate | $30-$80 |
| Door Gasket Degradation | Air leaks, longer preheat times | Moderate | $40-$100 |
| Control Board Corruption | Unresponsive controls, random errors | Hard | $150-$400 |
| Door Switch Failure | Oven won't start, no click sound | Easy | $15-$40 |
Safety Precautions During Diagnosis
Working with large appliances demands respect for electrical hazards. Always disconnect power at the source-not just the appliance switch-before touching internal components. Use insulated tools rated for household voltages. Never assume an outlet is dead; verify with a non-contact voltage tester. Capacitors retain charge even after unplugging, posing shock risks if mishandled.
Wear protective gloves when removing sharp-edged panels or handling hot surfaces inadvertently touched earlier. Keep children and pets away from work areas containing exposed wiring. Document disassembly steps with photos to aid reassembly. Label wires before detaching connectors to prevent confusion later. Following established safety protocols minimizes injury chances and protects your home’s electrical infrastructure.
When to Call a Professional Technician
While many oven repairs fall within DIY capabilities, certain situations warrant expert intervention. Gas-electric hybrid ranges introduce combustion risks requiring licensed professionals. Complex electronic diagnostics involving oscilloscopes or programming interfaces exceed typical homeowner skill sets. Warranty coverage often voids self-repair attempts, making authorized service calls financially prudent initially.
If troubleshooting reveals multiple simultaneous failures, underlying systemic issues may exist. Water damage near baseboards, rodent chewing on insulation, or previous amateur modifications complicate repair scenarios significantly. Technicians carry diagnostic equipment capable tracing signal paths precisely, identifying subtle faults invisible to casual inspection. Their experience speeds resolution timelines compared to trial-and-error approaches.
How do I know if my oven heating element is bad?
Visual inspection reveals blistering, cracks, or discoloration on the coil surface. More definitively, testing resistance with a multimeter should show 10-30 ohms. Infinite resistance confirms failure requiring replacement.
Why does my oven run hotter than the set temperature?
A drifting temperature sensor sends inaccurate readings to the control board, causing excessive heating cycles. Alternatively, stuck relays on the control board keep elements powered continuously despite reaching target temps.
Can I replace the oven door gasket myself?
Yes, provided you follow safety procedures. Unplug the oven, remove inner door panels, detach the old seal, clean adhesive residue thoroughly, and install the new gasket following manufacturer alignment guides.
What causes an electric oven to make buzzing noises?
Buzzing often originates from failing relays on the control board switching power rapidly. It can also indicate loose mounting hardware vibrating against metal structures during thermal expansion cycles.
Is it safe to use my oven if the door switch is broken?
No. The door switch acts as a critical safety interlock preventing heating when doors are open. Bypassing it creates burn hazards and violates electrical codes governing appliance installations.