Can You Replace an Element on an Electric Hob? A Step-by-Step Guide
 Jun, 7 2026
Radiant Hob Element Replacement Guide
Repair Progress
Complete the steps below to track your progress.
🛠️ Tools Checklist
1 Cut the Power
Go to your main electrical panel and flip the breaker for the kitchen outlets or the dedicated circuit for the range. Do not rely on the knobs on the hob. Verify the power is off by trying to turn on a burner.
2 Remove the Grate
Lift off the cast iron support grate. Set it aside safely in an area where it won't get damaged or cause injury.
3 Lift the Old Element
Gently lift the faulty coil straight up. It should slide out of its recess. If it sticks, wiggle it slightly. Do not force it, as you might damage the wiring underneath.
4 Disconnect Wires & Bracket
Look at the bottom of the element. Take a photo with your phone for reference. Unscrew the nuts holding the wires in place and pull them off. Remove the mounting bracket if applicable.
5 Install New Element
Place the new element into the hole. Align the terminals with the wires. Connect the wires back to the terminals and tighten the nuts securely. Reattach the mounting bracket if applicable.
6 Test Before Closing Up
Turn the breaker back on. Turn the knob for that burner to high. Wait 30 seconds. Does it glow red? If yes, turn it off. If no, turn the breaker off immediately and recheck connections.
7 Reassemble
Once confirmed working, turn off the power again, replace the grate, and you are done.
🎉 Repair Complete!
You have successfully replaced your electric hob element. Remember to clean spills immediately and use flat-bottomed pans to extend the life of your new part.
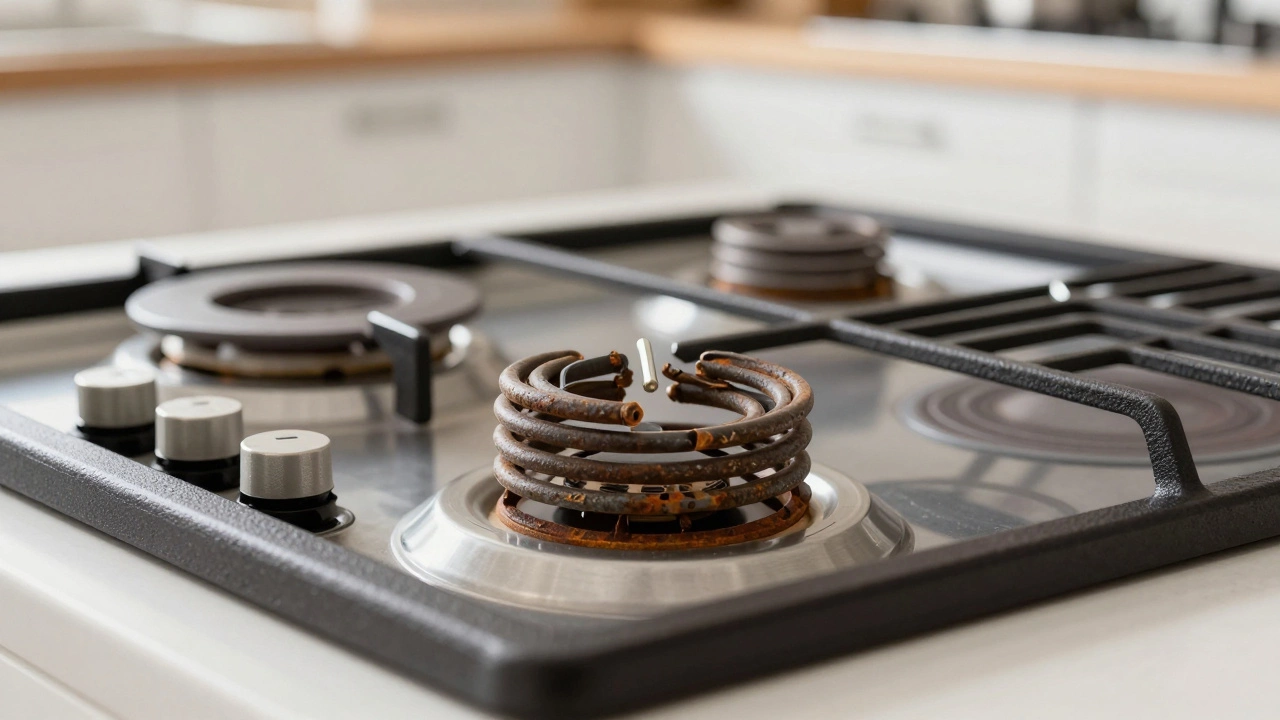
That moment when you put a pot on the stove and realize it’s not getting hot is frustrating. Maybe one burner works fine while another stays cold as ice. Or perhaps your old-fashioned coil element looks like a rusted pretzel. Before you call a technician who might charge $150 just to show up, ask yourself: can you actually fix this yourself?
The short answer is yes. In most cases, replacing a heating element on an electric hob is a straightforward task that requires basic tools and about an hour of your time. However, the method depends entirely on what type of hob you own. Swapping out a coil on a traditional radiant cooktop is child's play compared to dealing with the sealed glass surface of a modern induction or ceramic unit.
Quick Summary
- Radiant hobs: Coil elements are user-replaceable. Just unplug, remove the grate, unscrew the bracket, and swap the part.
- Ceramic/Glass hobs: The heating element is sealed under the glass. Replacing it usually means replacing the entire glass-ceramic top, which is complex and often costs more than a new hob.
- Induction hobs: These don't have traditional heating elements. If a zone fails, it's usually a control board or coil issue requiring professional service.
- Safety first: Always disconnect power at the breaker before touching any internal components.
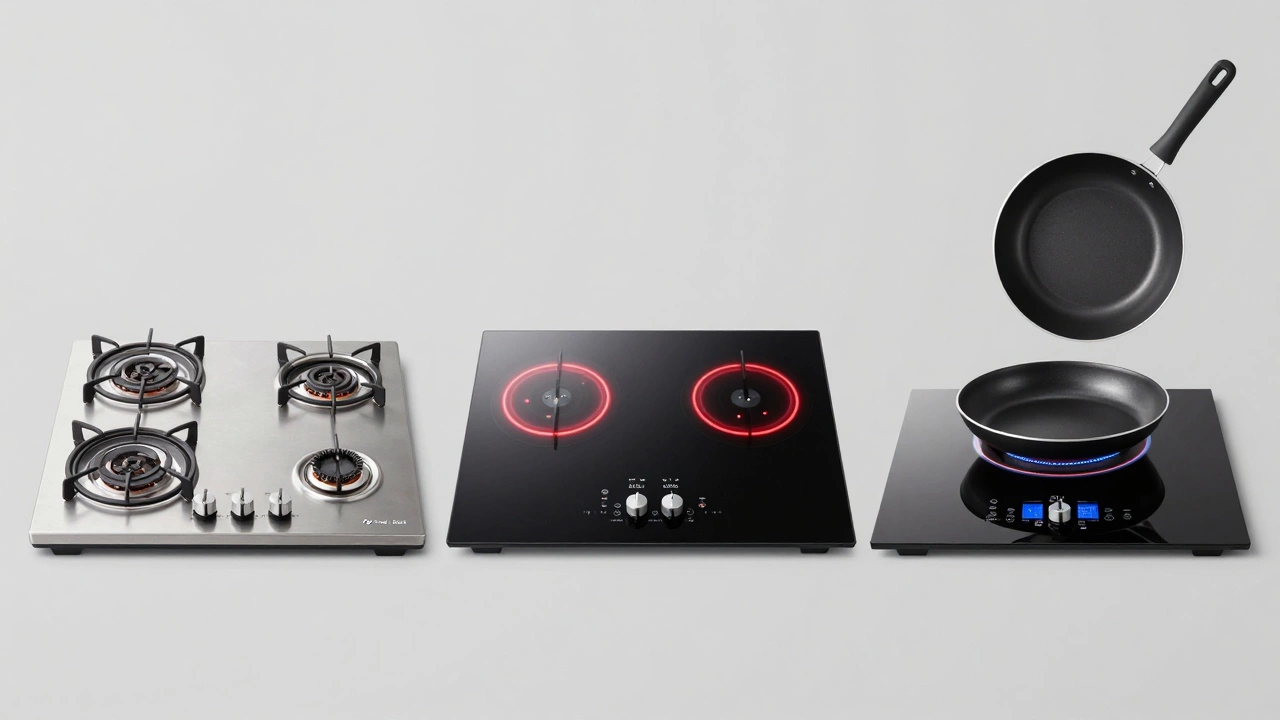
Identify Your Hob Type First
You can’t fix what you don’t understand. The term "electric hob" covers three very different technologies, and each has a distinct repair path. Look at your cooktop right now.
If you see raised metal coils or flat solid plates that glow red, you have a Radiant Hob is a traditional electric cooktop using exposed heating coils or solid metal plates to generate heat. This is the easiest type to repair. The elements are designed to be swapped by the homeowner.
If you have a smooth black glass surface where the burners light up in rings, you likely have a Ceramic Hob is a flat glass-ceramic cooktop with hidden halogen or infrared heating zones beneath the surface. Here, the "element" isn't a separate plug-in part. It’s integrated into the glass panel assembly.
If the display shows digital numbers and the pan heats up instantly without the surface glowing bright red, you have an Induction Hob is a cooktop that uses electromagnetic fields to heat compatible ferromagnetic cookware directly. Induction units do not have replaceable heating elements in the traditional sense. They use copper coils and electronic inverters. If a zone dies, it’s rarely a simple part swap.
Gathering Tools for Radiant Hob Replacement
Assuming you have a radiant hob (coil or solid plate), here is what you need to get started. Keep it simple.
- Replacement Element: Measure the diameter of your current element (usually 6, 8, or 10 inches) and check the wattage (often 1200W, 1500W, or 1800W). Buy the exact match from an appliance parts supplier.
- Phillips Head Screwdriver: Standard #2 size works for most mounting brackets.
- Needle-Nose Pliers: Helpful for gripping wire terminals if they are tight.
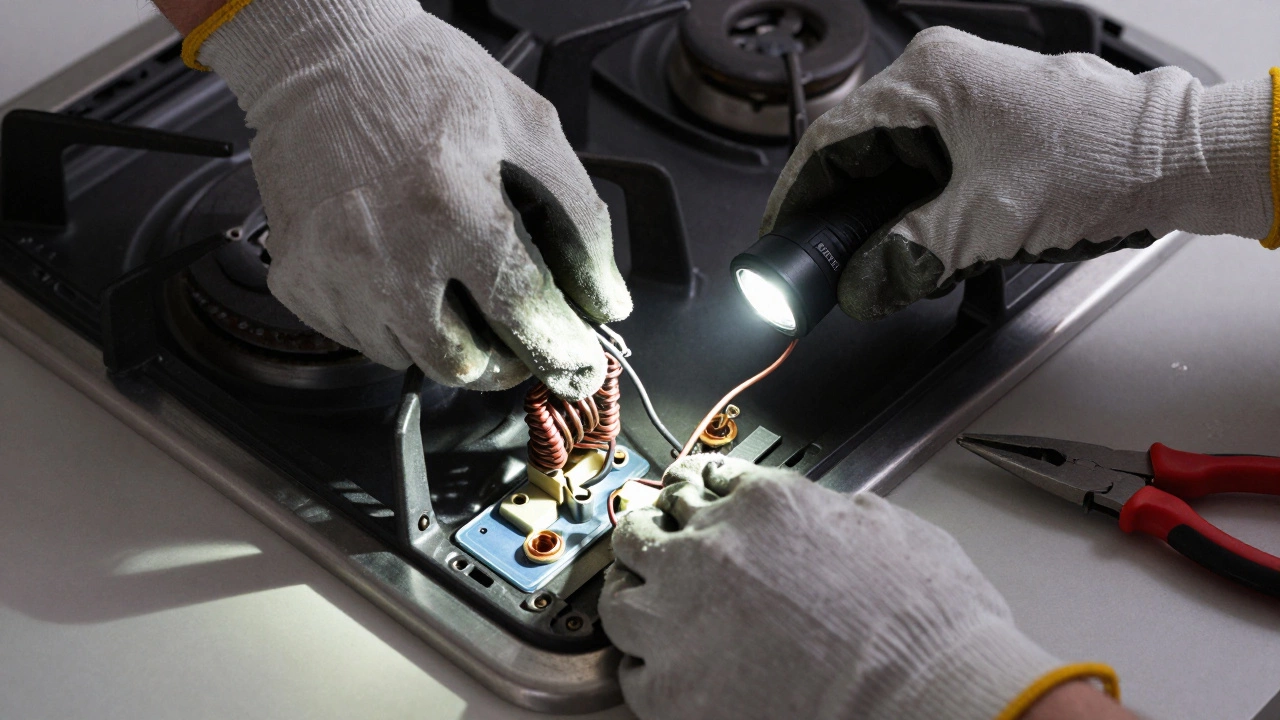
- Flashlight: To see into the dark cavity under the hob.
- Work Gloves: Old elements can retain heat or have sharp edges.
Do not buy universal adapters unless necessary. Matching the socket type (usually a two-prong terminal block) ensures a secure connection. A loose connection creates arcing, which melts wires and starts fires.
Step-by-Step: Replacing a Coil Element
This process takes less than 20 minutes. Follow these steps carefully.
- Cut the Power: Go to your main electrical panel and flip the breaker for the kitchen outlets or the dedicated circuit for the range. Do not rely on the knobs on the hob. Verify the power is off by trying to turn on a burner.
- Remove the Grate: Lift off the cast iron support grate. Set it aside safely.
- Lift the Element: Gently lift the faulty coil straight up. It should slide out of its recess. If it sticks, wiggle it slightly. Do not force it, as you might damage the wiring underneath.
- Disconnect Wires: Look at the bottom of the element. You will see two wires connected to metal terminals. Take a photo with your phone for reference. Unscrew the nuts holding the wires in place. Pull the wires off.
- Remove Mounting Bracket: Some models have a metal bracket holding the element down. Unscrew it and set it aside. Others hold the element in place by friction alone.
- Install New Element: Place the new element into the hole. Align the terminals with the wires. Connect the wires back to the terminals and tighten the nuts securely. Reattach the mounting bracket if applicable.
- Test Before Closing Up: Turn the breaker back on. Turn the knob for that burner to high. Wait 30 seconds. Does it glow red? If yes, turn it off. If no, turn the breaker off immediately and recheck connections.
- Reassemble: Once confirmed working, turn off the power again, replace the grate, and you are done.
Why Ceramic Hobs Are Different
If you tried lifting a "coil" out of your smooth glass hob, you failed because there isn't one accessible to you. In a Ceramic Cooktop, the heating mechanism is sealed within the glass-ceramic panel, making individual element replacement impossible without specialized equipment.
When a zone on a ceramic hob stops heating, the issue is usually one of three things:
- Broken Halogen/Infrared Bulb: Inside the glass, there are bulb-like heaters. While technically replaceable, accessing them requires removing the entire glass top from the chassis. This involves disconnecting multiple sensors, the control board, and delicate flex cables. One cracked cable during reassembly ruins the whole unit.
- Control Board Failure: The electronics that tell the heater to turn on may have failed. This is a common point of failure in older ceramic hobs.
- Cracked Glass: If the glass is cracked, the entire top must be replaced. There is no patching glass-ceramic.
For most homeowners, replacing the internal heater of a ceramic hob is not cost-effective. Labor plus parts often exceeds $400. A new mid-range ceramic hob costs between $300 and $600. Unless you are highly skilled with electronics and have the right suction cups and pry tools, call a pro or consider upgrading.
Induction Hob Troubleshooting
Induction technology changes the game completely. There is no glowing red element. Instead, a copper coil under the glass creates a magnetic field that excites molecules in your iron-based cookware. The pan gets hot; the glass stays relatively cool.
If an induction zone isn't working, check these basics first:
- Pan Compatibility: Put a magnet on the bottom of your pan. If it doesn't stick strongly, the pan won't work on induction. The hob will beep and refuse to heat.
- Zone Size Mismatch: Most induction hobs have a minimum pan size (e.g., 12cm). If your pan is too small, the sensor won't detect it.
- Child Lock: Accidentally activating the lock can disable all touch controls. Hold the lock icon for 3 seconds to release it.
If the hardware itself is dead-meaning the fan runs but the zone never activates-it’s likely a fault in the inverter board or the copper coil assembly. These are not DIY repairs. The components are proprietary and require calibration. Attempting to open an induction hob voids warranties and risks high-voltage shock.
Safety Risks You Must Avoid
Electricity does not care how careful you think you are. Here are non-negotiable safety rules.
Never work on a live circuit. Even if the knob is off, voltage is present at the terminals. Use a multimeter to confirm zero volts at the element sockets before touching wires. If you don’t have a multimeter, assume it’s live and stay away.
Watch for sharp edges. Old heating elements, especially solid plates, can have jagged metal breaks if they shattered. Wear cut-resistant gloves.
Avoid water exposure. Ensure your hands and the area around the hob are completely dry. Moisture bridges electricity, causing shocks or short circuits.
Check grounding. When reconnecting wires, ensure the ground wire (usually green or bare copper) is securely attached to the chassis. A loose ground can make the metal frame of your stove electrified.
When to Call a Professional
DIY saves money, but not always wisdom. Call a licensed appliance repair technician if:
- The problem persists after replacing the element. This suggests a deeper issue like a broken switch, timer, or wiring harness.
- You smell burning plastic or see scorch marks inside the oven or under the hob. This indicates melted insulation or a short circuit.
- Your home has aluminum wiring. Older homes sometimes used aluminum instead of copper. Aluminum degrades over time and requires special connectors (CO/ALR rated) to prevent fires. If you’re unsure, stop.
- The hob is still under warranty. Opening the unit usually voids the manufacturer’s coverage.
Cost Comparison: DIY vs. Pro
| Scenario | Part Cost | Labor Cost | Total Estimate |
|---|---|---|---|
| Coil Element (Radiant) | $15 - $40 | $0 (DIY) | $15 - $40 |
| Coil Element (Pro Service) | $15 - $40 | $80 - $120 | $95 - $160 |
| Ceramic Top Assembly | $150 - $300 | $100 - $150 | $250 - $450 |
| Induction Control Board | $100 - $250 | $100 - $150 | $200 - $400 |
As you can see, the radiant coil swap is the only scenario where DIY offers massive savings. For ceramic and induction units, the labor intensity makes professional help more predictable, though expensive.
Maintenance Tips to Extend Life
Prevention is cheaper than cure. Keep your hob running longer with these habits.
Clean spills immediately. Sugar and acidic foods can corrode metal contacts over time. On radiant hobs, let the element cool completely before wiping. Thermal shock can crack ceramic glass.
Use proper cookware. Flat-bottomed pans ensure even contact. Warped pans cause uneven heating and stress the element. For induction, ensure the base is large enough to trigger the sensor.
Don't overload circuits. Running a space heater, microwave, and electric hob on the same 20-amp circuit can trip breakers or degrade wiring. Check your panel labels.
Inspect grates regularly. On radiant hobs, debris falls through the grates onto the heating element. This insulates the element, causing it to overheat and fail prematurely. Vacuum the underside occasionally.
Frequently Asked Questions
How much does it cost to replace an electric hob element?
For a standard radiant coil, the part costs between $15 and $40. If you hire a professional, expect to pay an additional $80 to $120 for labor, bringing the total to roughly $95-$160. Ceramic and induction repairs are significantly more expensive, often exceeding $300 due to complex parts and labor.
Can I replace a heating element on a glass-top stove myself?
Generally, no. The heating elements in glass-ceramic hobs are sealed under the glass panel. Accessing them requires removing the entire top assembly, disconnecting sensitive electronics, and resealing the unit. This is a job best left to certified technicians to avoid damaging the fragile glass or voiding warranties.
Why is my electric hob sparking?
Sparking usually indicates a loose wire connection, damaged insulation, or moisture on the terminals. This is a fire hazard. Turn off the power at the breaker immediately and inspect the connections. If you see burnt marks or melted plastic, do not attempt to fix it yourself; call a professional electrician or appliance repair specialist.
How long does an electric hob element last?
A typical radiant coil element lasts between 5 to 10 years with regular use. Factors that shorten lifespan include frequent thermal shock (pouring cold water on a hot element), physical damage from heavy pots, and corrosion from spilled sugary substances. Ceramic and induction units often last 10-15 years but are harder to repair when they fail.
What are the signs of a bad heating element?
Common signs include the element not heating at all, heating intermittently, glowing unevenly (some parts red, others dark), or visible physical damage like cracks or breaks in the coil. If the element glows blue instead of red-orange, it may be overheating due to a short or poor contact.
Do I need to turn off the gas or electricity before repairing?
Since you are working on an electric hob, you must cut the electrical power at the main breaker panel. Do not just turn off the knobs. Gas lines are irrelevant unless you have a dual-fuel range, in which case you should also shut off the gas supply valve as a precaution.