How to Troubleshoot an Extractor Fan: A Step-by-Step Repair Guide
 May, 24 2026
Extractor Fan Troubleshooter
Select the issues you are experiencing. The tool will diagnose the problem and suggest a solution.
What is happening?
Diagnosis Complete
There is nothing quite as annoying as a kitchen that smells like last night’s curry long after you’ve cleaned up. You reach for the switch, expecting the hum of air being pulled away, but instead, you get silence. Or worse, a loud rattling noise that sounds like a bag of bolts in a dryer. An extractor fan is a ventilation device used to remove smoke, steam, and odors from a room by exhausting air outside or filtering it internally. When it fails, your home suffers. Before you call a technician or buy a new unit, there are several DIY checks you can perform. Most issues with extractor fans are simple fixes involving cleaning, resetting switches, or replacing worn parts.
Quick Summary / Key Takeaways
- Safety First: Always turn off the power at the circuit breaker before touching any part of the fan.
- Cleanliness Counts: Grease buildup on filters and blades is the #1 cause of reduced airflow and noisy operation.
- Check the Switch: A faulty wall switch or pull-cord often mimics a broken motor.
- Listen Closely: Rattling usually means loose screws or debris; humming without spinning suggests a seized bearing or capacitor issue.
- Know Your Type: Ducted fans need clear external vents; recirculating fans need fresh charcoal filters.
Why Your Extractor Fan Isn’t Working: The Basics
Before diving into tools, let’s look at the most obvious culprits. It sounds silly, but have you checked if the fan is actually plugged in? Many under-cabinet models plug into a standard outlet behind the cabinet. If the plug got bumped or the cord was tripped over, it might be disconnected. For hardwired units, check your main electrical panel. Did a circuit trip? Sometimes, a surge from another appliance can trip the breaker protecting your kitchen lights and fans.
If power isn’t the issue, look at the control mechanism. If your fan is controlled by a wall switch, that switch could be dead. Try bypassing the switch temporarily (if you are comfortable doing so safely) or test the switch with a multimeter. If you have a pull-cord model, inspect the cord. Is it stuck? Does it feel loose when you pull it? Internal mechanisms in pull-cords wear out over time, breaking the electrical connection even if the cord moves.
The Power of Cleaning: Filters and Blades
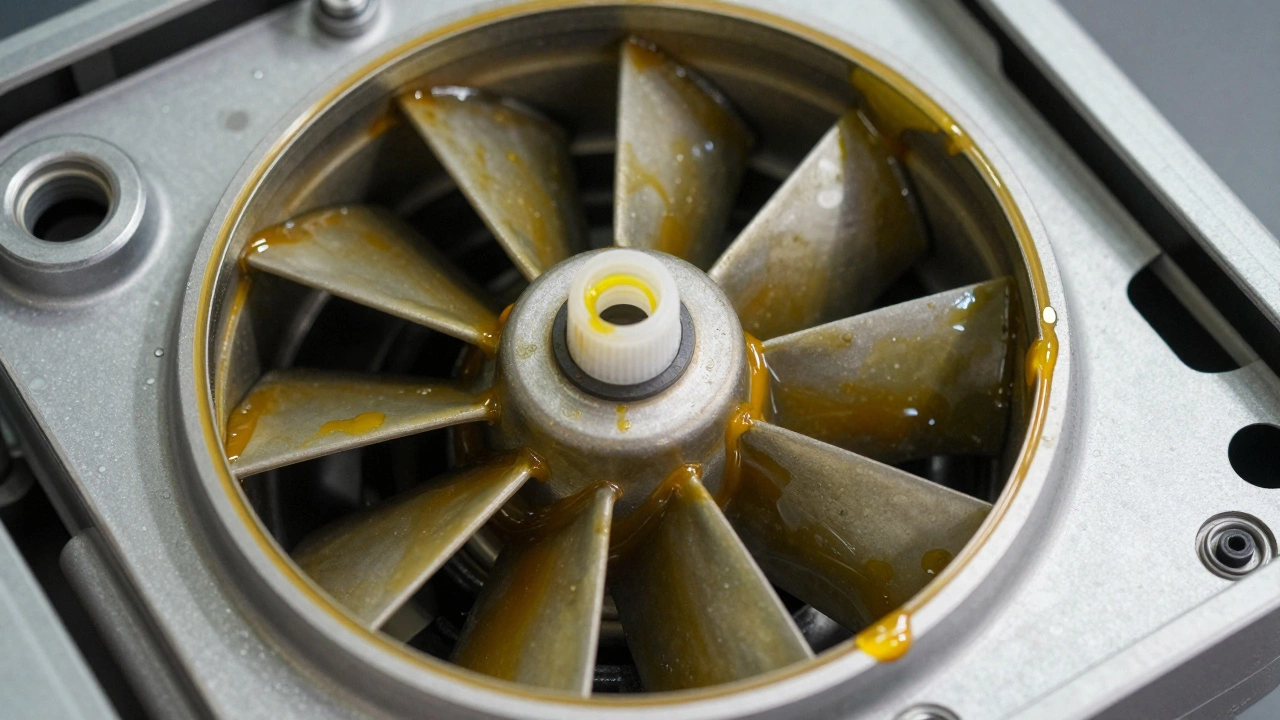
If the fan turns on but doesn’t seem to suck up anything, or if it’s louder than usual, grease is likely the enemy. Over time, cooking oils coat the metal mesh filters and the internal impeller blades. This adds weight to the blades, making the motor work harder, which leads to overheating and eventual failure. It also blocks airflow, rendering the fan useless.
- Remove the Filter: Most kitchen hood filters slide out or unscrew easily. Check your manual for specific instructions.
- Soak in Degreaser:** Place the filter in a sink filled with hot water and a strong degreaser dish soap. Let it soak for at least 30 minutes. For heavy buildup, use a specialized oven cleaner spray (ensure it’s safe for metal).
- Scrub Gently:** Use a soft brush to remove loosened grease. Avoid steel wool, which can scratch the surface and create places for more grease to stick later.
- Clean the Housing:** While the filter is soaking, wipe down the interior of the hood where the fan sits. Use a damp cloth with degreaser. Be careful not to get water into the motor housing.
- Dry Thoroughly:** Ensure everything is completely dry before reassembling. Moisture inside the electrical components can cause short circuits.
For recirculating fans, which filter air through charcoal rather than venting it outside, you must also replace the carbon filters. These cannot be washed. They typically need replacement every three to six months, depending on how much you cook. If you haven’t changed them in a year, they are likely saturated and blocking all airflow.
Diagnosing Noises: Rattling, Grinding, and Humming
Noise is a symptom, not just an annoyance. Different sounds point to different problems.
| Noise Type | Likely Cause | Fix |
|---|---|---|
| Rattling | Loose screws, debris in the duct, or unbalanced blades | Tighten mounting screws; check ductwork for birds/nests |
| Grinding/Squealing | Dry or worn bearings; lack of lubrication | Lubricate bearings (if serviceable); replace motor if sealed |
| Humming (No Spin) | Seized motor, bad capacitor, or obstructed blades | Check for obstructions; test capacitor; replace motor |
| Whistling | Air leaking through gaps in the ductwork or hood seal | Seal gaps with foil tape or silicone caulk |
If you hear grinding, the motor bearings may be dry. Some older motors have oil ports. You can add a few drops of lightweight machine oil (not WD-40, which evaporates too quickly). However, many modern motors are sealed and cannot be lubricated. In this case, the motor needs replacement.
A humming sound where the fan doesn’t spin is often a sign of a failed start capacitor, which provides the initial torque needed to start the motor spinning. If the capacitor is weak, the motor struggles to start. You can test a capacitor with a multimeter set to capacitance mode. If it reads significantly lower than its rated value (usually printed on the side), replace it. Capacitors are inexpensive and easy to swap if you know basic wiring.
Checking the Ductwork and External Vent
If you have a ducted extractor fan, which exhausts air directly outside through a pipe system, the problem might not be the fan itself but the path the air takes. Go outside and find the vent cover. Is it blocked by leaves, bird nests, or snow? Even a partial blockage can drastically reduce performance.
Inspect the exterior flap. Does it open freely when the fan is on? Sometimes, flaps get stuck due to dirt or rust. You can lubricate the hinge with silicone spray. Also, check the length and bends of your ductwork. Long runs with multiple 90-degree elbows create resistance. If possible, straighten the duct path or use larger diameter pipes to improve airflow. Flexible aluminum ducting is better than plastic corrugated tubing because it has smoother inner walls, reducing friction and noise.

Electrical Issues: Multimeter Testing
If cleaning and checking the duct didn’t help, it’s time to get technical. Warning: Electricity is dangerous. If you are not confident working with live wires, stop here and call a professional.
To test if the motor is receiving power, you’ll need a multimeter. Turn off the power at the breaker. Remove the fan housing to access the motor terminals. Set your multimeter to AC voltage. Carefully turn the power back on (only if you can safely touch the wires without risk of shock, or use insulated probes). Measure the voltage at the motor terminals while the switch is on. You should read close to your home’s supply voltage (e.g., 120V or 230V). If you get no voltage, the problem is upstream-likely the switch or wiring. If you get full voltage but the motor doesn’t run, the motor is likely dead.
You can also test the motor’s continuity. Turn the power off again. Set the multimeter to resistance (ohms). Touch the probes to the motor’s wire terminals. A healthy motor will show some resistance (typically between 50 and 500 ohms, depending on size). If you get infinite resistance (open circuit), the motor windings are burned out. If you get zero resistance (short circuit), the motor is also faulty. In either case, replace the motor or the entire fan unit.
When to Replace vs. Repair
Not every fan is worth saving. Consider the age and cost. If your fan is over 10 years old, parts may be hard to find. Motors for generic brands often cost nearly as much as a new, energy-efficient model. Newer fans are quieter, more powerful, and often come with LED lighting and smart features.
Repair is worth it if:
- The issue is simple (dirty filter, bad switch, loose screw).
- The motor is still good, but the housing or blades are damaged.
- You have a high-end brand where replacement parts are available and affordable.
- The motor is dead and the fan is cheap or old.
- The ductwork is severely compromised or incorrectly installed.
- The noise level is unbearable even after cleaning and lubrication.
Preventing Future Problems
Maintenance is key. Run the fan during cooking and for 10-15 minutes afterward to clear residual steam and grease. Clean the filters monthly if you cook heavily with oils. Inspect the external vent seasonally for debris. By keeping your kitchen ventilation system the network of fans, ducts, and filters that maintains indoor air quality clean and functional, you extend its life and keep your home smelling fresh.
How do I know if my extractor fan motor is burnt out?
A burnt-out motor usually emits a burning smell, shows signs of scorching on the wires, or fails continuity tests with a multimeter. If the fan hums but doesn’t spin, and you’ve ruled out mechanical obstructions, the motor windings are likely damaged.
Can I use WD-40 on my extractor fan bearings?
No, WD-40 is a water displacer and light lubricant, not a long-term bearing lubricant. It will evaporate quickly and can attract dust. Use a lightweight machine oil or white lithium grease specifically designed for electric motors.
Why is my extractor fan vibrating?
Vibration is often caused by an imbalance in the fan blades due to uneven grease buildup, loose mounting screws, or a warped impeller. Clean the blades thoroughly and ensure all screws securing the fan to the hood are tight.
How often should I change the charcoal filter in a recirculating fan?
Charcoal filters should be replaced every 3 to 6 months. Unlike metal grease filters, they cannot be cleaned. Once saturated with odors and moisture, they lose effectiveness and restrict airflow.
Is it safe to clean the extractor fan while it is plugged in?
Absolutely not. Always disconnect the power at the circuit breaker before removing any panels or touching internal components. Water and electricity are a deadly combination.