How to Tell if Your Oven Element is Broken: Signs and Tests
Apr, 30 2026
Oven Heating Element Diagnostic Tool
Step 1: Symptom Analysis
What's happening with your oven?
Select the symptom that best describes your situation to start the diagnostic process.
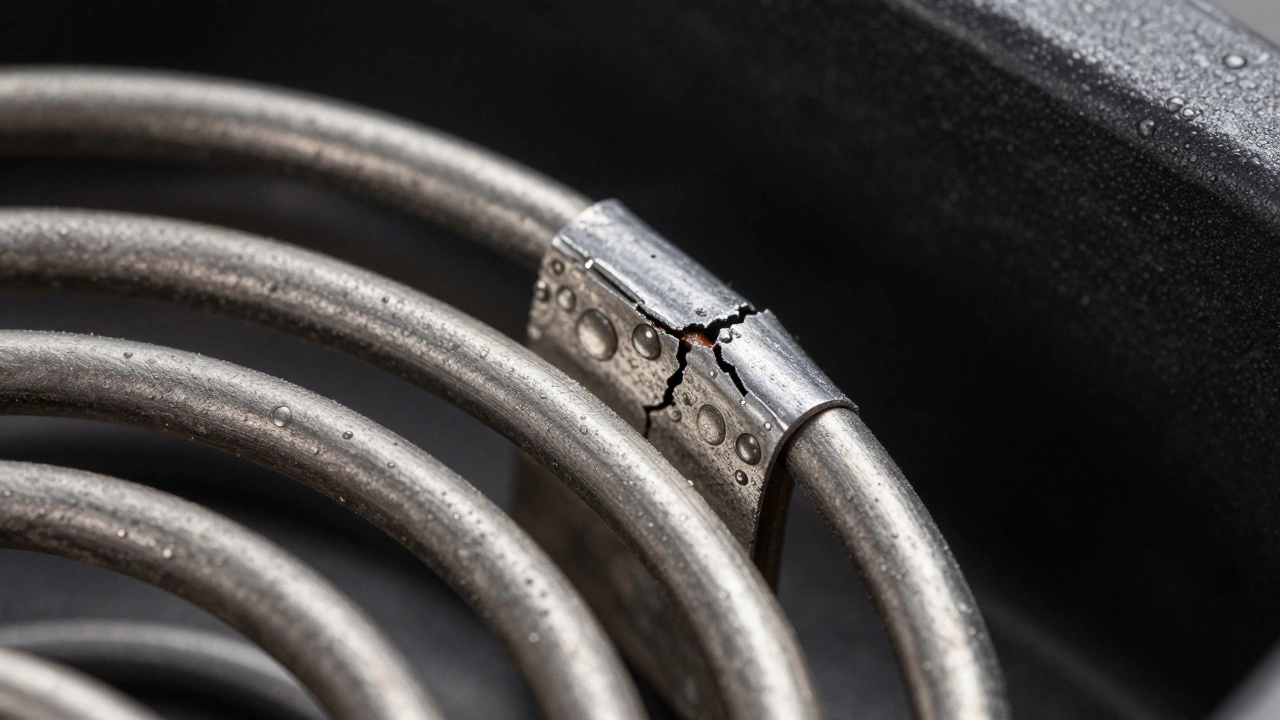
Step 2: Visual Detail
What do the coils look like?
Step 2: Performance Detail
Describe the heating problem
Step 2: Resistance Value
Enter the Multimeter Reading
Imagine you've spent three hours prepping a roast, only to find your dinner is still raw in the middle after an hour in the oven. It's a frustrating spot to be in, and usually, the culprit is a failed heating element. When these parts go, they don't always just stop working instantly; sometimes they just get sluggish, leaving you guessing why your cookies are burnt on the bottom but raw on top.
Quick Signs of a Failed Element
The oven takes way longer than usual to preheat.
Food cooks unevenly (e.g., the bottom is charred but the top is pale).
You see visible blisters, cracks, or breaks in the element coil.
The oven doesn't heat up at all, even though the light is on.
You smell a strong electrical burning scent when you first turn it on.
Understanding the Oven Element
To figure out what's wrong, you first need to know what you're looking at. Oven Element is
a metal heating coil that converts electrical energy into heat via resistance.
Depending on your model, you likely have a bake element at the bottom and a broil element at the top. These elements are made of a nickel-chromium alloy designed to withstand extreme heat without melting, though they eventually wear out due to thermal expansion and contraction.
Most modern ranges use a Electric Oven system where these elements are controlled by a thermal switch or electronic control board. If the element is broken, the circuit is interrupted, and the electricity can't flow to create heat.
Visual Inspection: The First Step
Before you grab any tools, do a visual check. This is the easiest way to spot a failure. Open the oven door and look closely at the coils. You're looking for "hot spots" or physical damage.
Check for small blisters or bubbles on the surface of the metal. These are signs that the internal wire has thinned or burned through. If you see a complete break in the coil-basically a gap where the metal has snapped-you've found your problem. It's a dead element. Even if the break is tiny, it's enough to stop the heating process entirely.
If you're dealing with a Convection Oven, remember that there's also a third element near the fan. If your oven heats up but the air isn't circulating or the temperature is inconsistent, that third element might be the one acting up.
The Multimeter Test for Certainty
Visuals can be deceiving. Sometimes an element looks perfect but has an internal break called an "open circuit." To be 100% sure, you need to test for oven element repair necessity using a Multimeter, which is
a handheld device used to measure electrical properties like voltage, current, and resistance.
Safety First: Unplug the oven from the wall or flip the breaker at the main electrical panel. Never touch a live element with a meter.
Access the Element: Remove the element from the oven wall. You'll usually find two screws holding the flange in place. Pull the element out and disconnect the wires from the terminals.
Set the Meter: Turn your multimeter to the Ohms (Ω) setting. This measures resistance.
Touch the Terminals: Place one probe on each of the two terminals of the element.
If the meter shows a reading (usually between 10 and 50 ohms depending on the brand), the element is likely fine. If the screen says "OL" (Open Loop) or doesn't move at all, the element is broken internally and needs to be replaced immediately.
Interpreting Multimeter Results for Oven Elements
Reading
What it means
Action Required
10-50 Ohms
Circuit is complete and healthy
Check the thermostat or control board
OL / Infinite
Broken internal filament (Open Circuit)
Replace the element
0 Ohms / Very Low
Short circuit (dangerous)
Replace the element immediately
Is it the Element or Something Else?
If your element tests fine with a multimeter but the oven still isn't heating, the problem lies elsewhere. A common culprit is the Thermostat, which
is the sensor that tells the oven when to turn the heat on or off. If the thermostat is faulty, it might never tell the element to engage.
Another possibility is a blown Thermal Fuse. These are safety devices designed to cut power if the oven overheats to prevent a house fire. Once a fuse blows, it won't reset itself; you have to replace it. If you have power to the clock and light, but zero heat from a healthy element, the fuse or the control board is likely the issue.
Check your Control Board for any burnt marks or bulging capacitors. These boards act as the "brain" of the appliance. If a relay on the board fails, it can't send the 240 volts required to heat the coil, regardless of how new the element is.
Common Pitfalls During Replacement
If you've decided to swap the part yourself, there are a few traps people fall into. First, don't just buy any "universal" element. While they claim to fit everything, a slightly different wattage can lead to uneven cooking or, worse, damage to your oven's interior lining.
Always match the part number exactly. You can find this on the element's flange or by searching your oven's model number. When installing the new part, make sure the wires are seated firmly. Loose connections create electrical arcs, which can melt the terminal block and lead to a much more expensive repair.
Lastly, avoid over-tightening the screws. The metal of the oven wall can strip easily, and if the element isn't seated flush, it can vibrate during use, which shortens its lifespan.
Can I use the oven if only one element is broken?
Technically, yes. If your bake element is working but the broil element is dead, you can still bake cakes and roasts. However, you won't be able to brown the top of your dishes. It's generally safe, but your cooking times will be off, and you should replace the part soon to avoid putting extra stress on the remaining healthy element.
Why does my oven element glow red in some spots and not others?
A slight variation in glow is normal, but if you see distinct dark patches while the rest is glowing bright red, it's a sign of "thinning." The metal is wearing out in those spots. This is a precursor to a total break. If the dark spots are significant, the element is failing and will likely snap soon.
How long do oven elements usually last?
On average, a high-quality element lasts between 7 and 12 years. Factors like how often you use the self-clean feature (which hits extremely high temperatures) can shorten this lifespan. Frequent high-heat roasting also accelerates the wear and tear on the metal alloy.
Does a broken element cause a smell?
Yes. If the element has a small crack or is shorting out, you might smell a pungent, metallic, or "electric" burning scent. This happens as the electricity jumps the gap (arcing) or burns the surrounding insulation. If you smell this, turn the oven off immediately to avoid an electrical fire.
Can I fix a broken element with solder or tape?
Absolutely not. Oven elements reach temperatures over 500 degrees Fahrenheit. Solder will melt instantly, and electrical tape will ignite. The only safe way to fix a broken element is to replace the entire unit with a manufacturer-approved part.
Next Steps and Troubleshooting
If you've tested the element and it's working, but the oven still won't heat, start with the power supply. Check your circuit breaker. Electric ovens often use a double-pole breaker; if only one side trips, the clock might work, but the oven won't heat.
For those who aren't comfortable with a multimeter, your best bet is to call a professional. If you're doing it yourself and the new element still doesn't work, double-check that you didn't accidentally bump a wire loose during the installation process. A quick visual re-check of all connections often solves the problem.
 Apr, 30 2026