How Do You Service an Extractor Fan? Step-by-Step Guide for Homeowners
 Feb, 26 2026
Extractor Fan Maintenance Calculator
Determine how often you should service your extractor fan based on your usage patterns. This tool uses guidelines from the article to recommend optimal maintenance intervals for your specific situation.
Your Fan Usage Patterns
Your Recommended Maintenance Schedule
Pro Tip: Set a calendar reminder for to ensure consistent maintenance.
Extractor fans are one of those appliances you hardly notice-until they stop working or start sounding like a jet engine. If your kitchen or bathroom fan is louder than usual, not pulling out steam, or covered in grease, it’s not broken. It just needs servicing. And the good news? You can do it yourself in under an hour with basic tools. No electrician needed. No expensive repair bills. Just a few simple steps to get it running quietly and efficiently again.
Why Servicing Your Extractor Fan Matters
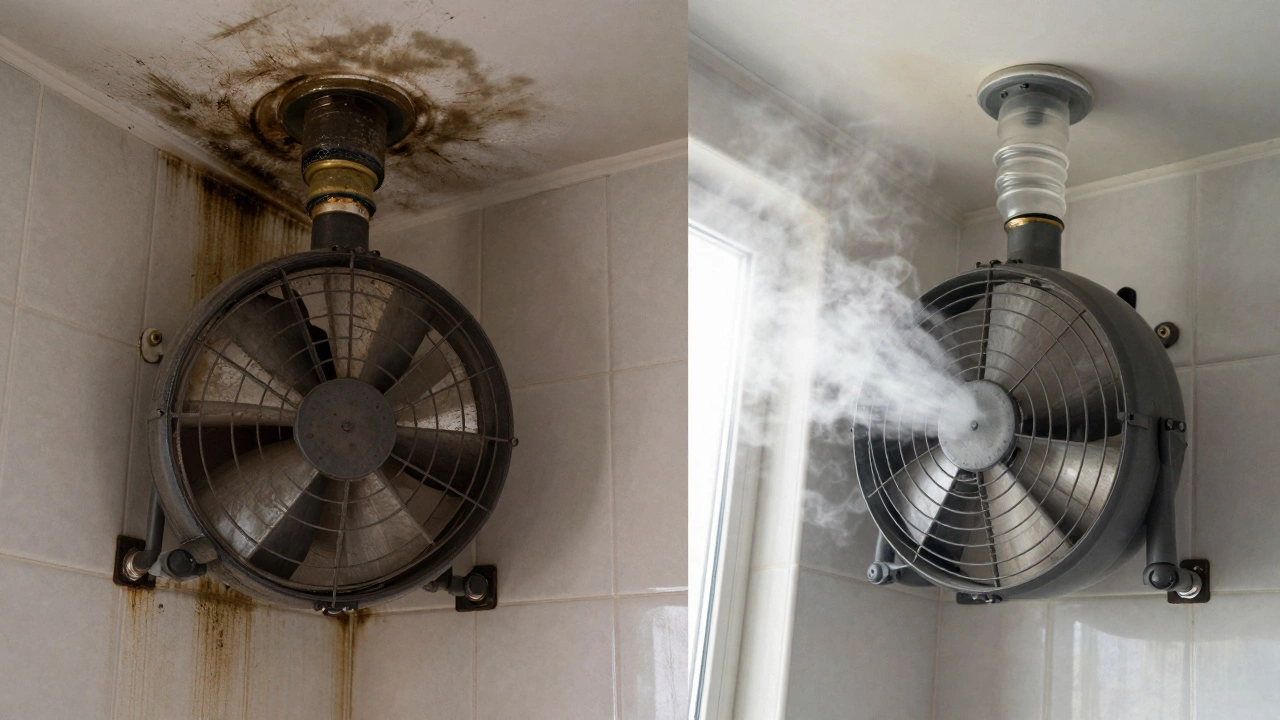
Most people think extractor fans are just there to remove smells. But they do more than that. They control moisture, prevent mold, and protect your walls and ceilings from long-term water damage. When grease, dust, and hair build up inside the fan, it forces the motor to work harder. That leads to overheating, higher energy bills, and eventually, motor failure. A clogged fan can also pull air backward, bringing odors and humidity back into your home instead of pushing them out.
According to a 2024 study by the Canadian Building Science Group, homes with neglected extractor fans showed 40% more mold growth in bathrooms and kitchens over a 12-month period. Regular cleaning isn’t optional-it’s a maintenance must.
What Tools You’ll Need
You don’t need a fancy toolkit. Here’s what’s actually required:
- Phillips screwdriver
- Flathead screwdriver (for stubborn grates)
- Microfiber cloths or old T-shirts
- Warm water and dish soap
- Vinegar or degreaser (for greasy buildup)
- Soft-bristle brush (toothbrush works great)
- Vacuum with brush attachment
- Gloves and safety glasses
That’s it. You probably have most of this lying around. Skip the chemical-heavy cleaners-dish soap and vinegar are just as effective and safer for your lungs and the environment.
Step 1: Turn Off the Power
Safety first. Never work on an electrical appliance while it’s live. Go to your circuit breaker panel and switch off the circuit that powers the extractor fan. If you’re unsure which one it is, turn off the main power. Use a non-contact voltage tester if you have one-just to be sure. This isn’t a step you can skip. One slip and you’re looking at a shock, not a clean fan.
Step 2: Remove the Fan Cover or Grille
Most extractor fans have a plastic or metal grille that snaps or screws into place. Look for small screws around the edges. Some models have clips-you’ll need a flathead screwdriver to gently pry them loose. Don’t force it. If it won’t budge, check again for hidden screws behind the edge or inside the housing.
Once removed, place the cover on a flat surface. You’ll be cleaning it next. Don’t toss it aside. Grease and dust will keep falling if you don’t clean it.
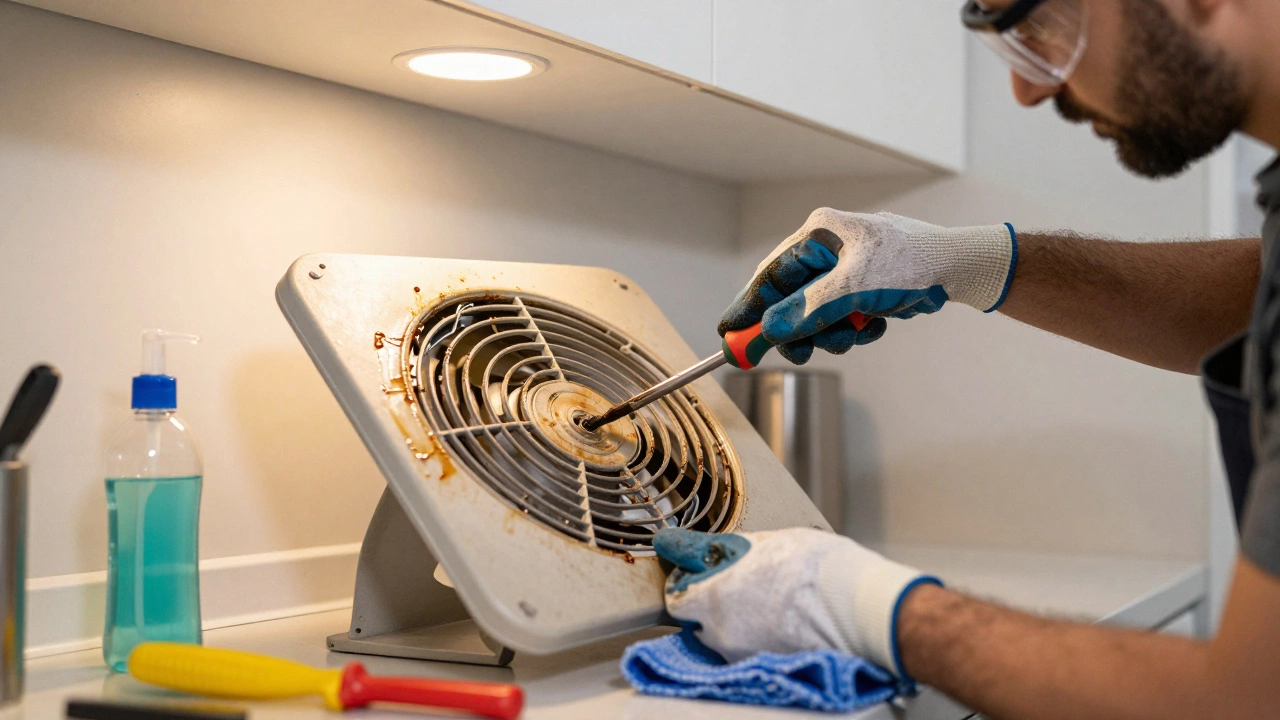
Step 3: Clean the Cover and Blades
Grease builds up fast in kitchen fans. Bathroom fans collect soap scum and hair. Soak the cover in warm, soapy water for 15 minutes. Scrub it with a soft brush. For stubborn grease, mix equal parts white vinegar and water. Spray it on, let sit for 10 minutes, then wipe clean. Rinse and dry thoroughly before reinstalling.
Now, check the fan blades. They’re usually attached to the motor shaft. Use a damp cloth to wipe each blade. If they’re caked with grease, dip the cloth in vinegar solution. Spin the blades gently by hand to clean all sides. Don’t use a power drill to spin them-that can damage the motor.
Step 4: Vacuum the Interior
Once the cover and blades are clean, turn your attention to the inside of the housing. Use the vacuum’s brush attachment to suck up dust, lint, and debris. Pay special attention to the motor housing and the duct opening. A lot of people forget this part, but buildup here is what causes airflow problems. If you can see a lot of dust, it’s been months-or years-since it was last cleaned.
Pro tip: If you hear rattling inside, it might be a loose screw or a piece of debris. Use tweezers to remove anything you can reach. Don’t stick anything metal into the motor area.
Step 5: Check the Ductwork
Here’s where most DIYers stop-and where the real problem often hides. The fan might be clean, but if the duct is blocked, it’s still not working right. Go to your attic or roof vent and check the outside exhaust cap. Is it clear? Is it clogged with leaves, bird nests, or ice? In Toronto winters, ice dams are common. A blocked duct means your fan is working harder than it should, and moisture is getting trapped inside your walls.
If the duct runs through the attic, pull back insulation and check for kinks or crushed sections. Flexible ducts can collapse over time. If you find damage, you may need to replace the duct. A 4-inch rigid metal duct is far more efficient than old, sagging plastic.
Step 6: Reassemble and Test
Once everything’s clean and dry, put the cover back on. Make sure all screws are tight, but don’t overtighten-plastic can crack. Turn the power back on. Run the fan on high for a minute. Listen for unusual noises. Does it spin smoothly? Is the airflow strong? If it’s quiet and pulling air well, you’re done.
If it still makes noise or doesn’t seem to be moving air, the motor might be failing. Or the bearings could be worn. That’s when you call a professional. But 9 out of 10 times, a good cleaning fixes it.
How Often Should You Service Your Extractor Fan?
There’s no one-size-fits-all answer. It depends on how much you use it.
- Kitchen fan: Every 3 to 6 months if you cook often (frying, roasting, boiling). Once a year if you mostly bake or eat out.
- Bathroom fan: Every 6 to 12 months. More often if you have long showers or high humidity.
- High-use homes: If you have a large family or cook daily, clean it quarterly.
Set a reminder on your phone. Say, every March and September. It takes 20 minutes. That’s less time than scrolling through social media.
Signs You Need Professional Help
After cleaning, if you still see these issues, it’s time to call a technician:
- The fan won’t turn on at all
- You smell burning plastic or electrical odor
- It makes grinding or screeching noises
- It vibrates or shakes violently
- It runs but no air comes out (even after cleaning the duct)
These aren’t DIY fixes. A faulty capacitor, worn motor, or damaged wiring needs a licensed electrician. Don’t risk fire or shock trying to fix it yourself.
Prevent Future Problems
Here’s how to keep your extractor fan running smoothly for years:
- Use a range hood filter if you have one-clean it monthly.
- Don’t run the fan on high for hours. Use medium unless you’re cooking something smoky.
- Keep the area around the fan clear. No pots, towels, or clutter near the vent.
- Check the outside exhaust cap twice a year-especially in spring and fall.
- Replace the fan if it’s over 10 years old. New models are 30% more efficient.
Investing in a better fan now saves you money on energy bills and repairs later. Look for models with built-in timers and humidity sensors. They turn on automatically when moisture rises-no more forgetting to flip the switch.
Can I clean my extractor fan without turning off the power?
No. Never clean an extractor fan while it’s still connected to power. Even if it’s off, there’s a risk of accidental activation or live wiring inside the unit. Always turn off the circuit breaker before starting. Safety isn’t optional.
What if my extractor fan is still noisy after cleaning?
If the noise continues, the issue is likely mechanical. Worn bearings, a misaligned motor, or a damaged fan blade can cause vibrations. Try spinning the blades by hand-if they don’t turn smoothly or feel gritty, the motor may need replacement. Most fans last 8-12 years. If yours is older, replacement is often more cost-effective than repair.
Can I use a pressure washer to clean the fan?
Absolutely not. Pressure washers can force water into electrical components, damage plastic housings, and bend metal blades. Stick to hand cleaning with soap, vinegar, and a soft brush. Moisture damage from a pressure washer can lead to short circuits or mold growth inside the housing.
Do I need to clean the duct every time I clean the fan?
Not every time, but you should check it at least once a year. Look for blockages, kinks, or condensation inside. If you notice dust or debris building up in the duct, clean it with a vacuum and brush. In homes with long duct runs or attic installations, professional duct cleaning every 2-3 years is recommended.
How do I know if my extractor fan is energy-efficient?
Check the fan’s CFM (cubic feet per minute) rating and wattage. A good modern fan pulls at least 80 CFM while using under 15 watts. Look for ENERGY STAR certification-these models use 60% less energy than older ones. If your fan is from before 2010, it’s likely inefficient. Upgrading can cut your ventilation costs by half.
Final Thought: Don’t Wait Until It Breaks
Extractor fans are easy to ignore. But when they fail, the damage isn’t just annoying-it’s expensive. Mold remediation, ceiling repairs, and rewiring cost hundreds-or even thousands-of dollars. A 20-minute cleaning every few months prevents all of that. It’s one of the simplest, cheapest, and most effective home maintenance tasks you can do. And if you live in a place like Toronto, where humidity and cold combine to create condensation problems, it’s not just helpful-it’s necessary.