Can I Replace an Oven Element Myself? A Practical Guide for Homeowners
 Feb, 16 2026
Ever opened your oven and noticed it’s not heating up properly? The bake element might be dead. It’s a common problem, and the good news is: you can replace an oven element yourself-no professional needed. Most electric ovens use a simple, accessible heating element that fails over time. Replacing it takes less than an hour, costs under $50, and requires no special tools. But before you grab a screwdriver, here’s what you actually need to know.
How an Oven Element Works
Your electric oven has two main heating elements: the bake element at the bottom and the broil element at the top. The bake element does most of the work during normal cooking. It’s made of a coiled metal wire inside a protective tube, usually made of porcelain or metal. When you turn on the oven, electricity flows through the element, heating it up until it glows red. Over time, that wire gets brittle from repeated heating and cooling. Cracks form, the element stops conducting, and your oven won’t heat.
Signs it’s gone bad? The element doesn’t glow at all when the oven is on, food takes way longer to cook, or you see visible cracks, blisters, or burn marks. If the broil element still works but the bake element doesn’t, that’s a dead giveaway.
Tools and Parts You’ll Need
Before you start, gather everything. You won’t need much:
- A new oven bake element (match the model number exactly)
- A screwdriver (flathead or Phillips, depending on your oven)
- Needle-nose pliers (optional, for pulling wires)
- Work gloves (heat-resistant, just in case)
- A notepad and pen (to write down wire positions)
The part itself costs between $25 and $45. Don’t buy a generic one. Your oven model number is critical. You’ll find it on a sticker inside the oven door frame, on the side of the oven cavity, or on the back panel. Write it down. Then search for "[your model number] bake element" online. Brands like Frigidaire, GE, Whirlpool, and Bosch all have unique element shapes and connector types. Using the wrong one won’t just not work-it could be dangerous.
Step-by-Step: Replacing the Element
Follow these steps exactly. Skipping one could lead to shock or damage.
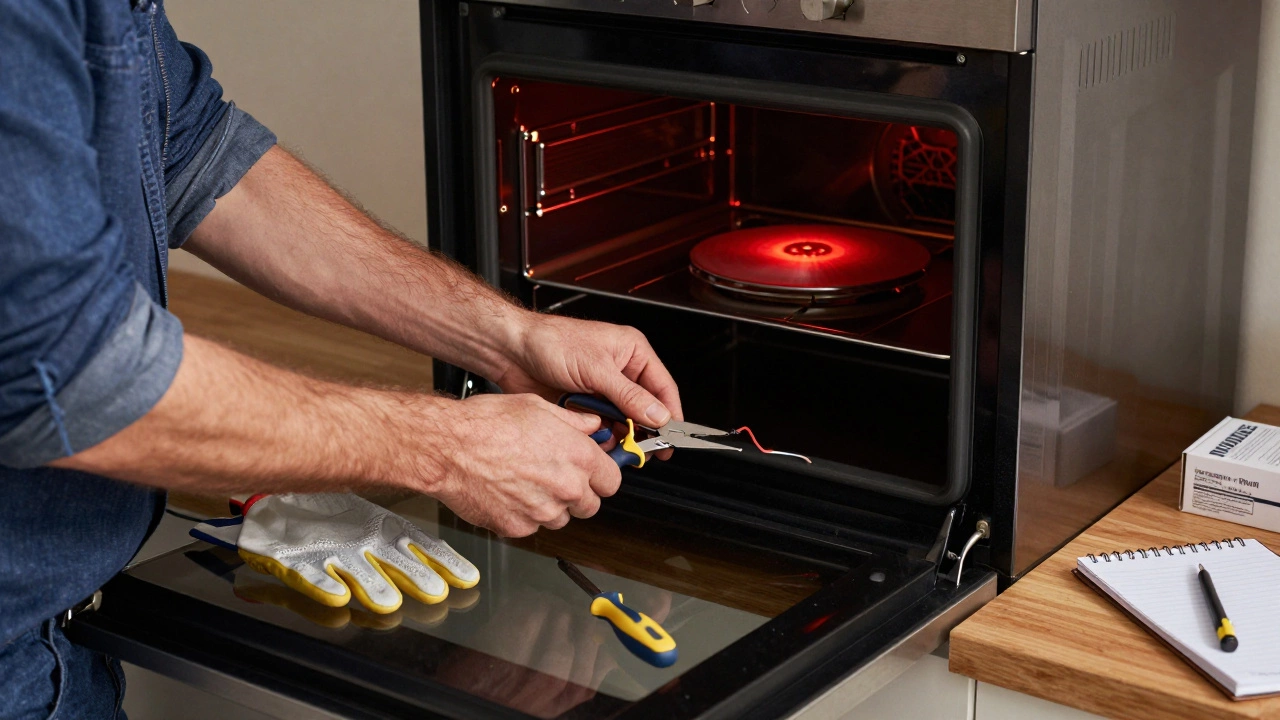
- Unplug the oven or turn off the circuit breaker. This isn’t optional. Even if the oven is off, the element is still connected to live wiring. You need to cut power at the source. In most homes, that’s a 240-volt double breaker in your electrical panel. Flip it off. Double-check with a voltage tester if you have one.
- Remove the oven racks. Clear space to work. You’ll need room to reach the back wall.
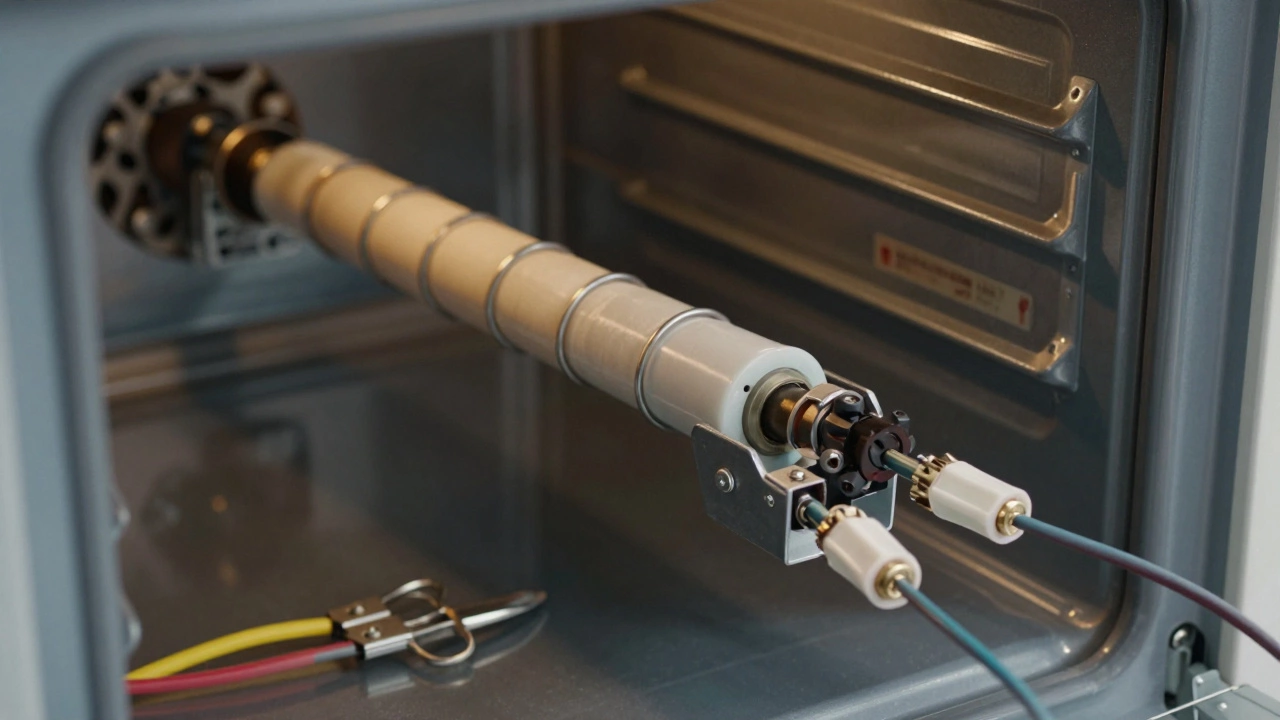
- Locate the bake element. It’s the long, U-shaped coil at the bottom of the oven. It’s usually held in place by two metal brackets on either side.
- Remove the screws holding the element. These are often on the inside back wall of the oven. You might need to pull the oven out from the cabinet to access them. Some models have screws from the front-check your manual if unsure.
- Disconnect the wires. Once the screws are out, gently pull the element forward. You’ll see two or three wires connected to metal terminals. Take a photo with your phone or write down which wire goes where. Never assume. The wires are not color-coded the same across brands. Use needle-nose pliers to gently pull the wire connectors off the terminals. Don’t yank.
- Install the new element. Slide the new element into place. Make sure it’s seated properly in the brackets. Reattach the wires exactly as they were. Push the connectors on firmly until they click. If they feel loose, they’re not secure.
- Reattach the screws. Tighten them snugly but don’t over-torque. The element should sit flush against the back wall.
- Restore power. Turn the breaker back on or plug the oven in.
- Test it. Set the oven to 350°F and wait five minutes. The element should glow bright orange. If it doesn’t, double-check your wiring. If it glows but the oven still doesn’t heat, the thermostat or control board might be the issue.
Common Mistakes to Avoid
People mess this up in predictable ways.
- Not turning off the breaker. This is the #1 reason people get shocked. Don’t be that person.
- Ignoring the model number. A $30 part that doesn’t fit is still a $30 waste.
- Forcing the wires. If a connector doesn’t slide on easily, don’t twist it. Check if you’re matching the right terminal.
- Assuming it’s the element. If the new element doesn’t work, the problem could be the thermostat, relay, or control board. Those are harder to fix yourself.
When to Call a Pro
You can handle the element swap alone. But if any of these apply, stop and call a technician:
- You’re not comfortable working with electricity
- The oven is gas-powered (gas ovens don’t have electric bake elements)
- The element is fused to the mounting bracket (you can’t remove it without damaging the oven)
- The oven has a hidden element behind a panel you can’t access
- The oven still doesn’t heat after replacing the element
Gas ovens are a different beast entirely. They use a pilot light or electric igniter, not a heating element. If you have a gas oven and it’s not heating, the issue is likely the igniter or gas valve-not something you should DIY.

Why This Fix Saves You Money
A professional oven repair technician charges $150-$300 just to show up. The part costs $30. Labor is often double the cost of the part. By doing it yourself, you save at least $120. That’s a new set of baking sheets, a month’s worth of groceries, or a nice bottle of wine. And you’ll know exactly how your oven works next time something goes wrong.
Most people don’t realize how simple this repair is until they try it. It’s one of the few home fixes where you can see immediate results. No guesswork. No waiting for a service appointment. Just turn the oven on and watch it glow.
Preventing Future Failures
Elements don’t last forever, but you can stretch their life:
- Avoid slamming the oven door-it jars the element and can crack the coil.
- Keep the oven clean. Built-up grease can overheat and damage the element.
- Don’t use the self-cleaning cycle too often. The high heat stresses the element.
- Replace the element as soon as you notice flickering or slow heating. Waiting until it’s completely dead gives you no warning.
Can I replace the oven element without turning off the power?
No. Never attempt to replace an oven element without cutting power at the circuit breaker. Even if the oven is off, the element is still connected to 240 volts. Touching live wires can cause serious injury or death. Always turn off the breaker and verify it’s dead with a voltage tester if possible.
How do I find my oven model number?
Look for a sticker inside the oven door frame, on the side of the oven cavity, or on the back panel. It’s usually labeled "Model No." or "Model Number." Write it down exactly as it appears. You’ll need it to order the correct replacement element. If you can’t find it, check the owner’s manual or search online using your oven’s brand and serial number.
Are all oven elements the same?
No. Oven elements vary in shape, size, wattage, and connector type. A Frigidaire element won’t fit a GE oven, even if they look similar. Always match the part number from your old element or use your oven’s model number to order the exact replacement. Using the wrong element can cause poor heating, damage to the control board, or even a fire.
How long does an oven element usually last?
Most oven elements last between 5 and 10 years, depending on usage. Heavy use, frequent self-cleaning cycles, or poor ventilation can shorten that lifespan. If your oven is over 8 years old and the element has failed, it’s worth checking other components too-like the thermostat or control board.
What if the new element doesn’t work after installation?
If the new element doesn’t glow, the issue might be with the wiring, thermostat, or control board. Double-check that all wires are securely connected and match the original positions. If the wiring looks correct, the thermostat or relay may be faulty. These require more advanced testing with a multimeter. If you’re unsure, call a certified appliance technician.