Can Extractor Fans Be Repaired? A Practical Guide to Fixing Common Issues
 May, 4 2026
Extractor Fan Repair Decision Tool
What is the main problem?
Select the symptom that best describes your extractor fan's current behavior.
Tell us more about the unit
This helps determine if a repair is worth the investment.
Diagnosis Complete
Analyzing...
Estimated Cost Savings
By following this path instead of buying a new unit immediately.
vs. repair/cleaning costs
There is nothing quite as frustrating as standing over a sizzling pan of onions, only to realize your kitchen extractor fan is humming loudly but pulling in zero air. Or perhaps you are trying to clear the steam from a hot shower, and the bathroom ventilation unit has gone completely silent. Before you toss that appliance into the recycling bin or call for an expensive replacement, ask yourself: can it actually be fixed?
The short answer is yes. In most cases, range hoods and exhaust fans are highly repairable. They are not disposable electronics; they are mechanical devices with moving parts, filters, and motors that wear out at different rates. Understanding whether a simple cleaning will solve the problem or if you need a new motor can save you hundreds of dollars and keep you out of the landfill.
Diagnosing the Problem: Is It Just Dirty?
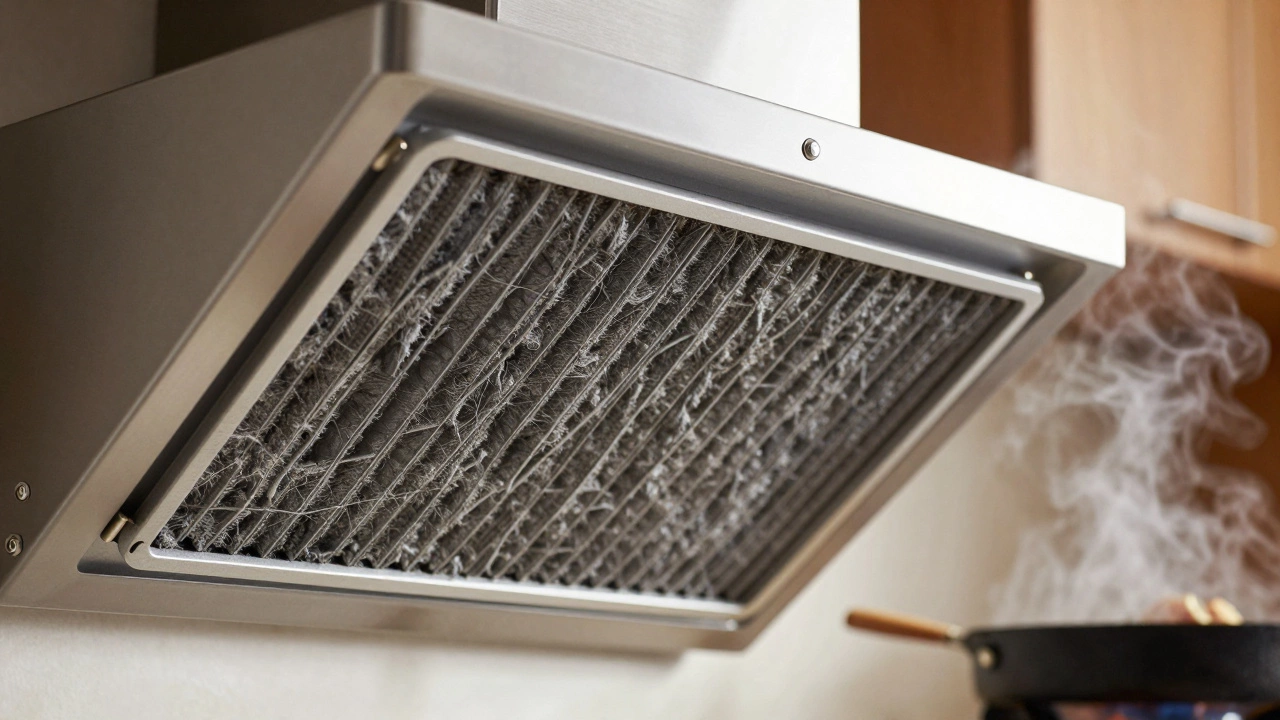
Before buying any parts, you need to identify exactly what is wrong. Most complaints about extractor fans fall into three categories: noise, lack of suction, or complete failure to start. The first step is always the simplest one-check the filters.
If you have a grease filter (usually made of aluminum mesh) in your kitchen hood, look at it. If it looks grey or black instead of silver, it is clogged. Grease buildup acts like a sponge, absorbing airflow. You can often restore 80% of the lost suction simply by soaking the filter in warm soapy water or putting it in the dishwasher. For charcoal filters, which trap odors rather than grease, these cannot be washed. They need replacing every six to twelve months, depending on how much you cook.
For bathroom fans, the issue is rarely grease. It is usually dust, hair, or insulation blocking the intake grille. Use a vacuum cleaner with a brush attachment to clean the visible blades and the grill cover. If the fan spins freely after cleaning but still doesn't pull air, the issue might be downstream in the ductwork.
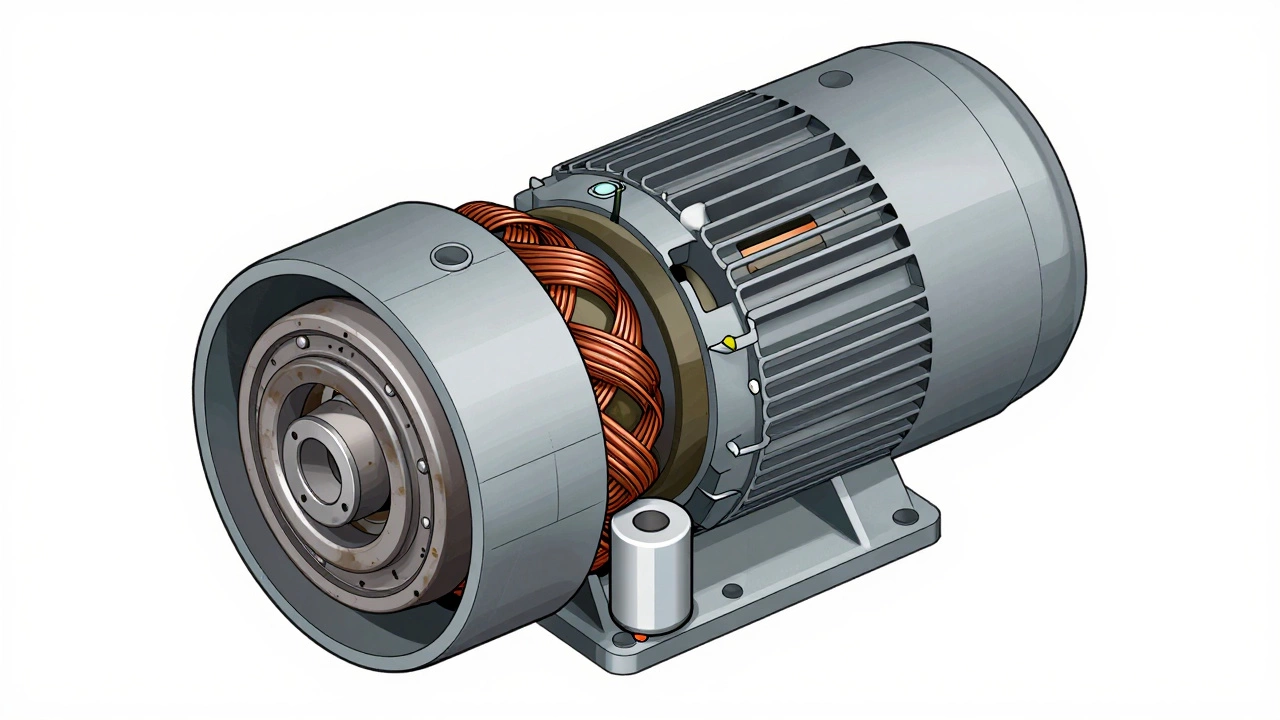
When the Motor Fails: Signs You Can’t Ignore
Sometimes, cleaning isn't enough. The heart of any extractor fan is the electric motor. Over time, the bearings inside the motor wear down, or the capacitor-which gives the motor the initial jolt to start spinning-dies. Here is how to tell if the motor is the culprit:
- Grinding or Screeching Noises: This indicates worn bearings. The rotor is rubbing against the stator. While you can sometimes replace just the bearings, it is often cheaper to replace the entire motor assembly.
- Burning Smell: If you smell burnt plastic or wire, unplug the unit immediately. The windings inside the motor are overheating. This is usually a sign of irreversible damage.
- Fan Spins Slowly or Not at All: If the fan turns on but barely moves, or makes a humming sound without spinning, the capacitor may be dead. Capacitors are cheap and easy to replace if you are comfortable with basic electrical work.
In my experience living in Toronto, where we deal with extreme humidity shifts between winter and summer, I’ve seen many bathroom fans fail because moisture corrodes the internal wiring connections. If you open the housing and see green corrosion on the copper terminals, cleaning them with electrical contact cleaner might revive the fan temporarily, but a replacement is likely needed soon.
DIY vs. Professional Repair: Making the Call
Deciding whether to fix it yourself or hire a pro depends on the type of fan and your comfort level with tools. Inline booster fans, which sit in your attic or ceiling void, are notoriously difficult to access. If yours stops working, you might spend more time crawling through insulation than fixing the motor. In those cases, calling a technician is worth the cost.
However, standard wall-mounted bathroom fans and under-cabinet kitchen hoods are very DIY-friendly. Here is a quick breakdown of what you can handle:
| Task | Difficulty | Tools Needed | Estimated Cost |
|---|---|---|---|
| Cleaning Filters | Easy | Dish soap, sponge, or dishwasher | $0 - $15 (for new charcoal filters) |
| Replacing Light Bulbs | Easy | None | $5 - $10 |
| Replacing Capacitor | Moderate | Phillips screwdriver, multimeter | $10 - $25 |
| Replacing Motor Assembly | Moderate/Hard | Screwdrivers, wrenches, possibly wire strippers | $40 - $100 |
| Clearing Blocked Ducts | Hard | Vacuum extension, flexible brush | $0 (if DIY), $150+ (if professional) |
If you are dealing with a built-in island hood, the complexity increases significantly. These units often have complex ducting systems hidden within cabinetry. A small mistake here can lead to poor performance or even fire hazards if grease accumulates in unreachable areas. For high-end models like Miele or Bosch, authorized service centers often offer repair services that extend the life of the unit far beyond the warranty period.
The Hidden Enemy: Ductwork Blockages
A common misconception is that if the fan motor runs, the system is working. But if the air has nowhere to go, the fan is useless. This is especially true in older homes. Bird nests, accumulated lint, or crushed flexible ducting can completely block airflow.
To test this, remove the outer vent cap from your roof or exterior wall. Look inside. If you see daylight and no debris, the path is clear. If you see a thick layer of dust or a nest, you have found your problem. Cleaning this out requires care-don't push debris further into the house. Use a shop vac to suck the obstruction out from the exterior end. If the duct is rigid metal, you might be able to reach in with a long brush. Flexible aluminum ducts, however, are prone to kinking. If the duct is severely crushed, replacing it is often easier than trying to straighten it out.

Cost-Benefit Analysis: Repair or Replace?
Let’s talk money. A new mid-range extractor fan costs between $100 and $300. Installation adds another $100 to $200 if you hire a handyman. A professional repair call-out fee in cities like Toronto or New York can range from $80 to $150 just for the diagnostic visit, plus parts and labor.
If your fan is less than five years old, repairing it is almost always the smarter financial move. Motors and capacitors are standardized parts. Even if you can’t find the exact brand match, universal motor kits are available for most standard sizes. However, if your fan is ten years old, the plastic housing may be brittle, and the seals degraded. At that point, upgrading to a newer, more efficient model might be better. Modern fans are quieter (measured in Sones) and use less energy (measured in CFM per watt).
Consider also the efficiency rating. Older fans might draw 75 watts of power to move 100 cubic feet of air per minute (CFM). Newer high-efficiency models can move 150 CFM using only 40 watts. Over a year, that savings adds up, especially if you run the fan frequently during cooking or bathing.
Safety First: Electrical Precautions
Any repair involving opening the housing means dealing with electricity. Always turn off the power at the circuit breaker before removing any panels. Use a non-contact voltage tester to confirm the wires are dead. Do not rely on the switch alone. Old switches can fail in the "on" position, leaving live wires exposed when you think they are safe.
If you are unsure about wiring colors or connections, take a photo before disconnecting anything. Most modern fans use color-coded wires: black for hot, white for neutral, and green or bare copper for ground. Matching these correctly is critical. If the fan has a light kit, there may be additional low-voltage wiring for LEDs, which should not be confused with main power lines.
How do I know if my extractor fan needs repair or replacement?
If the fan is noisy due to dirty filters, it needs cleaning. If it smells like burning or makes grinding noises, the motor bearings are likely worn, suggesting a motor replacement. If the unit is over 10 years old and inefficient, full replacement is often more cost-effective than repeated repairs.
Can I repair a broken extractor fan capacitor myself?
Yes, if you are comfortable with basic electrical safety. Turn off the power at the breaker, locate the capacitor (usually a small cylindrical component near the motor), note its microfarad (µF) rating, and replace it with an identical one. Ensure all wires are connected securely.
Why does my extractor fan run but not suck up smoke or steam?
This usually indicates a blockage in the ductwork or a severe grease buildup on the filters. Check the exterior vent for bird nests or debris. Clean the internal filters thoroughly. If both are clear, the fan motor may be weak and unable to generate sufficient static pressure.
Is it worth hiring a professional to repair an extractor fan?
For simple issues like filter cleaning or bulb replacement, no. For complex issues involving inaccessible inline fans, electrical rewiring, or high-end integrated hoods, yes. Professionals have specialized tools to diagnose duct blockages and ensure code-compliant electrical connections.
How often should I clean my kitchen extractor fan filters?
Grease filters should be cleaned every month if you cook frequently. Charcoal filters cannot be cleaned and should be replaced every 3 to 6 months. Regular maintenance prevents fire hazards and maintains optimal airflow efficiency.